Search This Blog

Monday, June 22, 2009

EMAIL ME Hack

This post helps to add a "Email me" link in your blog/webpage.
With this,if some one clicks on the "Email me" link, the visitor's microsoft outlook express will be open by default.
If he/she wants to send via others like gmail,yahoo,rediff,etc..they will simply copy your email address from the outlook express and send.
So,how to do this?
it's very easy
just add this javascript/html and place it wherever you like on your blog


<a href="mailto:abc@yahoo.com">Email me </a>

change the email address to yours

Peel over page effect Hack Blogger


You may have before seen a peel over effect on some proffessional website and not knew how to get that on your blog this post will help you get that on your Blog
you may use it to shoe advts ,rss feeds or whaterer you want and link it too

Here is the hack to do so..
just follow the steps they are short and sweet
Just login to Blogger,
Go To Layout > Edit Html > Press Ctrl + F[find]

Now place these codes above it


<style type='text/css'>
img { behavior: url(iepngfix.htc) }
#pageflip {
position: relative;
right: 0; top: 0;
float: right;
}
#pageflip img {
width: 50px; height: 52px;
z-index: 99;
position: absolute;
right: 0; top: 0;
-ms-interpolation-mode: bicubic;
}
#pageflip .msg_block {
width: 50px; height: 50px;
overflow: hidden;
position: absolute;
right: 0; top: 0;
background: url(http://www.astro.wisc.edu/~townsend/resource/news/rss.jpg) no-repeat right top;
}
</style>

<script src='http://code.jquery.com/jquery-latest.js' type='text/javascript'/>
<script type='text/javascript'>
$(document).ready(function(){

//Page Flip on hover

$("#pageflip").hover(function() {
$("#pageflip img , .msg_block").stop()
.animate({
width: '307px',
height: '319px'
}, 500);
} , function() {
$("#pageflip img").stop()
.animate({
width: '50px',
height: '52px'
}, 220);
$(".msg_block").stop()
.animate({
width: '50px',
height: '50px'
}, 200);
});


});
</script>


Red line is the image you want to show
Now search for


place the following code after it


<div id='pageflip'>
<a
href='http://feeds2.feedburner.com/widgetblogger'><img alt=''
src='http://www.wallheaven.com/page_flip.png'/></a>
<div class='msg_block'></div>
</div>
Thats it enjoyy and any prob tell me through the comment form;)
Special thanks to Anshul dudeja:)

Wednesday, June 17, 2009

MARQUEE-Scrolling text and link hacks

Marquee can considerably increase the viewers attention towards the text or link rolling into it.


It is used and is can be useful for any announcements on your Blog.

>>How to add the scrolling text in your blog?
Let me explain it:

ONE Adding simple scrolling text:
          
Here is the code to add a simple scrolling text from right to left side


The output:.....


code to simple scrolling text
         If you want some more attention of your Viewers,


         Change the Background color to the text,
         Note: Use matching and favourable colours that look good with each other.


The output:.....


code to simple scrolling text
        You can choose your background colour by replacing the hexadecimal code(#99ccff).
Click here to see the codes of the different colors.

Here are some mode attributes to learn:


direction="left"

direction="right"

direction="up"

direction="down"

The above attributes tells the text which direction to scroll.
Apply whichever you want


Here are its examples   ....................


code to simple scrolling text


code to simple scrolling text


code to simple scrolling text


code to simple scrolling text

More attributes:
                              You can add this attribute to alternate the text means it will bounce within the coloured area.


Like this

code to simple scrolling text
Its Code:-


You can also set the speed up the widget text with a simple attribute:


The lower the scroll amount value, the less speed it moves,
the html code adding scrollamount would be


(for scrollamout =2) in this marquee it would be at this speed


code to simple scrolling text


(for scrollamount=10)


code to simple scrolling text


        TWO
        Pausing the text when mouse is over the text: 
        It is very useful when the reader wants to read the text,and the scrollamount is big,sothat he will put the mouse           over the text to pause the text and read the matter:
        Here is the code for it


It will have the following feel


code to simple scrolling text
(Roll the mouse over the text)


           THREE
           Changing the text colour:
           Here is the code to change the text colour:(Add it before the marquee tag)

The whole code would be like 


code to simple scrolling text


Here are the codes for various colours

Here is the important and most useful one, adding hyperlinks in the scrolling text 
Hyperlink means a link when clicked go to another location(site).
Let's see how to add hyperlinks to the scrolling text:


FOUR
Adding hyperlinks(open in the same window):

sample sode for it.
 Replace the Link#1,Link#2,Link#3 with the text and url#1,url#2 and url#3 with the desired url addresses.


The output will look like this


EtalkIndia Colour Codes Gmail


If you want to open the links in new window,here is the code:
Here's the code for it


That's it!Now you can add this to your blogger sidebar,in the blog post,where ever you want.

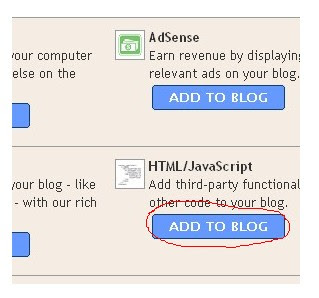
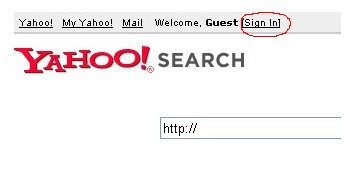
If you want to put this in sidebar,then sign in to your blogger account>click the add a page element> and paste the code in html/javascript and 
save the changes .This is shown in the below pictures.


Blogger Widgets
happy marqueeing
If you have any doubts, ask your questions via your comments.


Tell us which widgets you need us to post

Ads below every Blog title Widget

Every blogger wants to get some money for all the hardwork he/she puts in for Blog.
So we also know that one of the best available publisher heaven is Adsense...Bidvertiser 

You place ads on your Web-Blog  ,on pages and places they appear prominant for your viewers.
I thought which place would be more 'visible' ,other than the place after the Title.
And moreover let me tell you that this code wont pop up in your read more column on your Homepage [if u have enabled READ MORE],there your visitors will naturally see the summary
 of the Web-page Blog post.

As i said before your blog earnings depend mainly on your Weblog's traffic and on your 
ad placement.

This is in accordance with the Google Adsense Terms of service.

I am personally using the same Hack Widget on this blogger Blog. You can see bid ads below the post title on my post pages.

Ok 
now lets know how to set it up.
go to Adsense or Bidvertiser and get the Ad selected

Now copy the ad code to parse it

Parse It Here{{untick the "add blockcode" on the parsing site}}


Copy off the parsed code..
Now login to your blogger account.
Goto Layout> Edit Html and expand the widget templates.
Find this piece of code


Now paste this code before it.
<!-- widgetblogger.co.cc Adsense Above Posts start -->
<b:if cond='data:blog.pageType == "item"'>
Put your parsed
adsense code here

<br/>
</b:if>
<!--
widgetblogger.co.cc Adsense Above Posts End
-->

So friends now enjoy this Widget on your Blog
won't you give us backlink; add the code on the right sidebar to do that..
[if u are viewing in email u might not see the code; click on the title of post to see the original post]
More such amazing Blog Widgets coming soon..so stay tuned..

Tuesday, June 16, 2009

EntreCard .What is It?

The day i read about Entrecard at my friend's blog, i spent about 30 minutes on website and it

proved to be constructive and beneficial for my blogs. Entrecard is one of the best websites,

which lets you advertise your blog or website among Entrecard users (blogs and websites)

for Entrecard credits. Its not difficult to earn credits needed to advertise. I loved the concept of

this website because it helps a blogger to drive more and more traffic over a period of time.My

friend have been using Entrecard for more than 2 months. At the initial stage, he did not get

potential visitors. They were only visiting his blog to earn points; but now he have regular

visitors to his blog. So I think EntreCard is a good thing.

Swap :ur Blog Post Title|Blog Title ,in search engines


Here is a Blogger hack that will change the title to the following attractive format Post Title then Blog Title


This trick will increase your site's visitor count.. It will take a while for the Formatted titles to appear in search results though [depending how often search bots index your site]


your result would be like


Your Blog Post titleyour Blog name


Description


Url


Find this code in the edit html of layout


Replace it with...


That all you have to do.


and one more thing some patience for the expected title swapping to happen.


Monday, June 15, 2009

how to Blog? SUCCESSFULY!! and to earn from it.

There are countless amounts of blogs all over the Internet today. 

Some of these blogs are personal, some of them try to sell their products, and most of them are blogs that are created to make money.
Everyday many people create blogs to start up their online fortune. They all start their blogs with good spirit and ambition to earn some money from the Internet. However, most of these blogs are abandoned with failure as people can't see the return they expected. So why do these blogs fail, while others can get lots of visitors and earn lots of money :))

From my own experience, I can tell you why these people stop writing to their blogs. I personally started many blogs. 

Each blog that created is about different subjects. I will not go in great details about those blogs, however I stop writing to all of them including this one. I just gave up. I didn't see enough return from the blogs. Also traffic was not that great. But recently I started blogging again. Because, although it was very obvious, I figured what my mistakes were, and figured how a blog can be a success.

Key to a blogs success is PATIENCE. That is the only thing you have to have from the start. Experts will tell you lots of things about good blogging, but if you don't have the patience, all those good advices will going from one ear and go out from the other. Those experts will tell you that you need to create good content. You need to write about something that you enjoy, something that you know. All of these are right. But without patience you can't do any of these advices. Because it takes time for a blog to become successful and start making money.

So I realised, only reason I failed is because I didn't have the patience to create good content, I didn't have the patience to write regularly, I didn't have patience to create back links for my blog, and I didn't have patience to carry on with my blog. But now, I got back my patience and god knows what the future holds.

Wednesday, June 10, 2009

Every Blog post Unique backdrop

For example if it is a travel blog a background picture of the Eiffel Tower can serve very well. what's more!.. A different background for only the specific blog post area
You can also have transparent backgrounds in your blog over which the blog text scrolls. this Blogger hack is just Wow! if you choose the right picture.

Here's how to do this..............1. Login at Blogger.com.
2. Click on Settings link on the Dashboard.
3. Click on the Formatting subtab of the Settings tab.

4. Scroll down in the Formatting tab to the Post Template at the bottom.

5. Paste this code at the top of the box :

just note that when posting u add your blog post after

and at the last add this code[after finishing the post]
hope u know how to do this


any problem tell me through the comments form

6. Save Settings.
7. Replace 'LINK_OF_PICTURE' with actual link of the picture uploaded to your free host. If you do not want the picture to repeat then
delete the "no-repeat" in the code line
.

This post i used the same code with this post


cool widget isn't it
What do u think!

Friday, June 5, 2009

6 steps to Index Web-Blog from Google Webmaster

This Web-post explains how to generate and submit blogger sitemap to google webmaster tools: [ie to Google]

Before doing this,let us know what are
sitemaps and how they will help us.

The reason we use them is,they will help google bot to crawl,index pages of your site and tell you if there are any problems when they try to index it.

It also helps you to know,how many pages exactly are indexed,and what people searched [keywords] in the search engine get to your web-blog


 The detailed procedure on how to submit your blogger sitemap to google.

1.First,go to google webmaster tools and sign in with your gmail account.


2.After you logged in, you will see this asking you to add a site.


[click+to+add+a+site.jpg]
Add your blog url(eg: widgetblogger.co.cc).Don't add with http or www.


3.Next,it asks you to verify your site.Add the given meta tag code Between head tag .
It is just to confirm whether you are the owner or not.
click on the 'verify your site' link.

Next,


choose verification method


4.There are two ways to verify your ownership but, there is only one way for the blogger users to add a metatag.


copy the metatag


5.Copy the metatag.

Now,sign into your blogger account>click the layout button>Edit html and paste the metatag just after the head tag and save the changes.


paste the metatag like this


and click the verify button in the google webmaster tools and there will be a confirmation message saying that you have sucessfully verified.


Go back to the google webmaster dashboard or (home) and click the 'Add' link which is next to your blog name and in the Sitemaps column.Then,you do this,


Choose 'Add general web sitemap' from the dropdown menu and type rss.xml or atom.xml next to your blog address as shown below


and click the 'Add General Web Sitemap' button.


6.That's it.Now your sitemap is successfully submitted to google.Check 2 or 3 days after and you will see the detailed statistics of your blog(indexed pages,any errors,etc.)


Thursday, June 4, 2009

Flash effect for ur template


G
et the snow fall effect to your Blogger template with this simple code

1.Login to your dashboard--> layout- ->Page

Elements


2.Click on '
Add a Gadget' on the sidebar.

3.Select 'HTML/Javascript' and add the code given

below and click save.Add it anywhere.

<script src="http://keerthiset2.110mb.com/snow.js" type="text/javascript">

</script>

Hope you liked the effect ..more such effects on their way ..tell me by the comment form which type would you like...............

Wednesday, June 3, 2009

Tweet me Twitter Icons ,buttons

Ulike twitter bird icons ? Twitter bird in vector, eps or psd or png format..? then, this is a treat for you..

Adding a cool
Twitter graphic to your website/blog can encourage your site visitors to follow you on twitter...and it gets backlinks for your site too
Here is a
collection of Twitter bird logos,Twitter icon sets,etc. All these are 100% Free to download
(btw:Get tweet me twitter button here)


Cute Twitter Bird Vector Art - by Smashing Magazine

Cute Twitter Bird Vector ArtFormat : Vector (.eps), photoshop (.psd)


Twitter Bird Follow me Button : by IconTexto

Twitter Bird Follow me buttonFormat : png


Free Twitter Birds : by Luc Latulippe

Free Twitter Birds in vector formatFormat : vector (eps)


I personally liked this one....................hope you will like it too
Free Twitter Buttons : by Randa Clay

Free Twitter Bird ButtonsFormat : png


Happy Twitter Birds : by Adams

Happy Twitter BirdsFormat : Photoshop (psd) , png


Twitter Follow me Icon : by antonist ~ deviantart

Twitter follow me icon with black backgroundFormat : Jpg file


TwitterBird : by Lisa

Twitter BirdFormat : jpg

Embed Small Digg Button in Blogger posts

This tutorial explains how to embed a Digg Button into your blogger template's posts, which will be displayed every time you post. The button displays the amount of times each post has been dugg and lets users digg directly from your blog.

Here are the Steps:
Make sure to Backup your Template! [very Important]

Open your blogger template, click Expand Widget Templates, and search for the code below:

Add this code below directly above the searched code above 

<!-- DIGG --><div style='float:right; margin-left:10px;'><script type='text/javascript'>digg_url = '<data:post.url/>';</script><script src='http://digg.com/tools/diggthis.js' type='text/javascript'/></div>

Now save the template
If you like you may even add the Digg button by the sidebar
We can do this by adding the later code in the html/javascript section.

Tuesday, June 2, 2009

Easily Submit Sitemap to Yahoo

This post would in simple steps explain how to get yahoo index all your Blogger pages.And 

keep the yahoo bot coming back often.


So lets jump to the steps........

1.     Go to Yahoo Site Explorer


2.    Click on the 'Sign in' link which is at the top of the page,see the screenshot below(If you don't have a Yahoo id, you can get one Yahoo Id here) and sign into your accoutnt.

click on the 'sign in link'

3.     Type your blog url in the box provided as shown in the below screenshot.Don't forget to replace the 'yourblogurl' with the original url of your blog and click on the 'Add My Site'

4.     After adding your site,you need to Authenticate(Verify your ownership).
There are two ways to verify your ownership.One is to upload a file to the root directory of your site .This option is not be possible in blogger.

Another one is to 'adding a metatag' which is possible and the only way to verify ownership for bloggers.First,copy the metatag..

Next,sign in to your blogger account>Edit html and paste the metatag below the head tag and SAVE THE CHANGES,look at the screenshot below.

Next,you will get a message saying that 'Your site is pending authentication'

Note:Don't remove the metatag,they will revalidate your ownership by checking your ownership regularly.

5.Next,go back to the 'Site explorer home', and check the box next to your blog url and click on the Manage button.

6.Type rss.xml or atom.xml in the box provided.It helps yahoo to discover more of your site content via your rss or atom feeds and to index your blog pages quickly whenever your blog is updated.Next,click on the add feed button.


That's it.Now,you have sucessfully submitted your blog sitemap to yahoo.Check your account 

after a couple of days and you will see your blog indexed in yahoo search engine.or even better if 

you add a yahoo badge on your blog with every view of your site you will know the 

trackbacks this even increses the probability of yahoo indexing your site.You may find it in the 

left sidebar badges section of Yahoo site Explorer

Note:-
I myself had a problem when adding the meta tag given by yahoo . but was able to save the template by changing the end tag: 

> to this: />

Template then parsed and saved, Hope this helps..

Any Problems you can ask through the comments form