Search This Blog

Monday, August 24, 2009

Cool Bookmark Buttons

Hand Drawn Social Bookmarking Icon Sets

Hi friends this is a collection of 12 beautiful hand drawn Social Bookmarking Icon sets for your Blog or Website. Enjoy this cool collection of icons and don't forget to give your valuable comments .


FreeHand ColorStroked icon pac

Color Stroked Free Hand Icon Set By mfayaz

Hand Drawn Social Bookmarking Icon Sets


Black Magic Marker Social Bookmarking Icons

108 free high resolution Simple Black Magic Marker Social Bookmarking Icons By My Site My Way

Hand Drawn Social Bookmarking Icon Sets


Free Hand Drawn Doodle Icon Set for Bloggers

Set of free hand drawn doodle icons by Spoon Graphics

Hand Drawn Social Bookmarking Icon Sets


Handy Icons

24 free and exclusive vector icons by Web Designer Depot

Hand Drawn Social Bookmarking Icon Sets


Handycons: a free, hand drawn social media icon set

Free, hand drawn social media icon set containing 12 icons by Janko At Warp Speed

Hand Drawn Social Bookmarking Icon Sets


Handycons 2 - another free hand drawn icon set

Icon set containing 20 more hand drawn icons by Janko At Warp Speed

Hand Drawn Social Bookmarking Icon Sets


Social media icons

Hand made social media icons by plechi

Hand Drawn Social Bookmarking Icon Sets


Social Icons hand drawned

Hand drawn social media icons by TheG-Force

Hand Drawn Social Bookmarking Icon Sets


Free Social Networking Hand Drawn Photoshop Shapes

Set of Hand Drawn Social Networking Photoshop Shapes by My Site My Way

Hand Drawn Social Bookmarking Icon Sets


Sketch’d Up Vector Icon Set

Over 100 hand drawn icons in vector format designed by Oliver Twardowski

Hand Drawn Social Bookmarking Icon Sets


20 free Web 2.0 icons (colored pencil version)

Hand drawn Web 2.0 icons by Icon Expo

Hand Drawn Social Bookmarking Icon Sets


19 Free hand-drawn sketch icons

Hand-drawn sketch icons by Charfish Design

Hand Drawn Social Bookmarking Icon Sets
please social bookmark if you liked
Sunday, August 23, 2009

Change Blogger Favicon

This Blog post will explain how to add favicon for your Blog
The main advantage of creating and using favicon is ,it makes it easy to find your blog or site when someone favourited or bookmarked your site/blog among several other sites.


So,ready to create a favicon for your Blog!

favicon
All you need is a program to create a favicon in (.ico) format.If you haven't a program to create in .ico format,
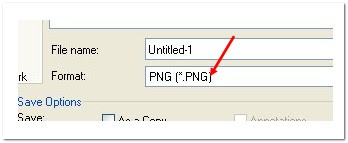
No Problem....you can also use png or gif format.If you have Photoshop, or any other programs like that,open it and create a 16*16 image and save it as .png or gif format [look at the below screenshot below]

save the image in png format
Or there are so many online sites which can create a Favicon for you,just google 'free online 16*16 icon generator' .They ask you to upload a picture from your desktop,and they convert it into 16*16 .ico file.

You are just a few steps away from creating a beautiful Favicon for your site....

go to your blog dashboard>Layout>Edit Html


and look for this code


add the following code right after it

<link href='http://www.textmarks.com/images/WidgetAlphaIcon-B.gif' rel='shortcut icon'/>
<link href='http://www.textmarks.com/images/WidgetAlphaIcon-B.gif' rel='icon'/>

replace the 'icon file url' ie http://www.textmarks.com/images/WidgetAlphaIcon-B.gif both the times with the url of your icon.

Any .gif .jpg image would do; search google for favicon .ico

That's it! Now you can see a beautiful favicon in your blog.

Feel free to add the comments..... and if it works share it!

Friday, August 14, 2009

Hypertext Link Blogger

Whenever you add any hypertext link to your blog post, you will see that the link is underlined. However some people don't like that the link is underlined and want to remove the underline.

This is possible by adding a small code in the link. Check the two links html given below. The first link html is the normal link which is underlined. However, the second link html would not result in underline.


<a href="URL" > </a>

<a href="URL" style="text-decoration: none;" > </a>


As we can see in the code shown above, we have added just the following code.

style="text-decoration: none;"


Its just a simple thing to do which will hardly take your time.

Saturday, August 8, 2009

Fluid Social bookmarks

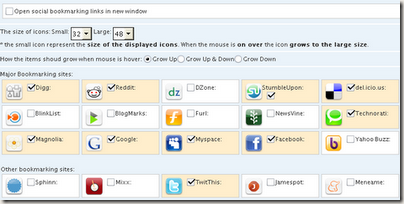
You want to add social bookmarking buttons in your blog you always want to add a nice, good looking buttons. SocioFluid is one of the most popular social bookmarking widget generator. Its easy to install and you can change buttons icon size too.

To add SocioFluid Bookmarking widget below posts:

Step 1 :

preview

  • If you are not like it you can customize it, you can add or remove icons and change size of icon.
  • If you are not like it you can customize it, you can add or remove icons and change size of icon.

so22

  • scroll down at the end of the page and press generate widget button:
  • If you want to add the widget below each blog posts click on 'Copy to Clipboard' to copy the code. But if you want to add the widget other place like sidebar, footer etc you can use 'Add to Blogger' or 'Copy to Clipboard'.

Step 2 :

  • Go to Layout--->Edit HTML---->Click on Expand widget templates.
  • Now paste your widget code after the line .
  • Click on "Save Templates" and you are done.

Tuesday, August 4, 2009

Publish Blogger Post by email

The mail to Blogger feature in the blog enables you to publish the post via Email. For this feature you have to make a change in you r blog setting. Just go to “Settings” then click “E-mail & Mobile” or “E-mail”


You can create a mail to Blogger address which you will use to publish the posts via email to your blog:

To post to your blog via email, you need to configure your mail to Blogger email address in Settings | Email:


The format of the email address will be username.secretword@blogger.com. Note that this Email must be kept secret. Otherwise, anyone who gets it will be able to post as you.

Also be sure to specify whether or not you prefer your email posts to publish automatically. If this option is not checked, then your posts will be saved on your account but will not appear on your blog until you log in to Blogger.com and publish them yourself.

Once you have saved your Settings, you can send email to your blog. The subjects of your email letters will be the titles of your posts, and the body of the emails will be the posts themselves. To include an image in your post, you can attach an image to you your email.


Note......
• Sometimes email programs append text to the bottom of each sent message; to make sure this cruft doesn't get posted to your blog, put #end at the end of your post.

Sunday, August 2, 2009

Social Bookmarking Widget

Many Bloggers today want their end of the post shine bookmarking widget.

and let me tell you your wait is over.Not like I have never seen a bookmarking Widget below


a post.


But, I have never found it with something sexy. Yes, It has a short title "add is sexy", very


stylist and also sexy.... :). Please see the screenshot below.


And It's not that dull as it looks. It's more responsive try hovering your mouse over the same


widget below this post.


Now, I will try to explain about how to add that in Blogger.


Step 1 Go to LAYOUT -- Edit HTML -- (checked expand widget templates)( I recommend you


to Backup the existing Template first)


Step 2 Afterwards, Add this CSS composition below it.


<style type='text/css'>
div.sexy-bookmarks {
height:54px;
background:url('http://i43.tinypic.com/2ueii3t.png') no-repeat left bottom;
position:relative;
width:540px;
}


div.sexy-bookmarks span.sexy-rightside {
width:17px;
height:54px;
background:url('http://i43.tinypic.com/2ueii3t.png') no-repeat right bottom;
position:absolute;
right:-17px;
}


div.sexy-bookmarks ul.socials {
margin:0 !important;
padding:0 !important;
position:absolute;
bottom:0;
left:10px;
}


div.sexy-bookmarks ul.socials li {
display:inline-block !important;
float:left !important;
list-style-type:none !important;
margin:0 !important;
height:29px !important;
width:48px !important;
cursor:pointer !important;
padding:0 !important;
}


div.sexy-bookmarks ul.socials a {
display:block !important;
width:48px !important;
height:29px !important;
font-size:0 !important;
color:transparent !important;


}


.sexy-furl, .sexy-furl:hover, .sexy-digg, .sexy-digg:hover, .sexy-reddit, .sexy-reddit:hover, .sexy-stumble, .sexy-stumble:hover, .sexy-delicious, .sexy-delicious:hover, .sexy-yahoo, .sexy-yahoo:hover, .sexy-blinklist, .sexy-blinklist:hover, .sexy-technorati, .sexy-technorati:hover, .sexy-facebook, .sexy-facebook:hover, .sexy-twitter, .sexy-twitter:hover, .sexy-myspace, .sexy-myspace:hover, .sexy-mixx, .sexy-mixx:hover, .sexy-script-style, .sexy-script-style:hover, .sexy-designfloat, .sexy-designfloat:hover, .sexy-syndicate, .sexy-syndicate:hover, .sexy-email, .sexy-email:hover {
background:url('http://img509.imageshack.us/img509/3131/sexysprite.png') no-repeat !important;
}


.sexy-furl {
background-position:-300px top !important;
}
.sexy-furl:hover {
background-position:-300px bottom !important;
}
.sexy-digg {
background-position:-500px top !important;
}
.sexy-digg:hover {
background-position:-500px bottom !important;
}
.sexy-reddit {
background-position:-100px top !important;
}
.sexy-reddit:hover {
background-position:-100px bottom !important;
}
.sexy-stumble {
background-position:-50px top !important;
}
.sexy-stumble:hover {
background-position:-50px bottom !important;
}
.sexy-delicious {
background-position:left top !important;
}
.sexy-delicious:hover {
background-position:left bottom !important;
}
.sexy-yahoo {
background-position:-650px top !important;
}
.sexy-yahoo:hover {
background-position:-650px bottom !important;
}
.sexy-blinklist {
background-position:-600px top !important;
}
.sexy-blinklist:hover {
background-position:-600px bottom !important;
}
.sexy-technorati {
background-position:-700px top !important;
}
.sexy-technorati:hover {
background-position:-700px bottom !important;
}
.sexy-myspace {
background-position:-200px top !important;
}
.sexy-myspace:hover {
background-position:-200px bottom !important;
}
.sexy-twitter {
background-position:-350px top !important;
}
.sexy-twitter:hover {
background-position:-350px bottom !important;
}
.sexy-facebook {
background-position:-450px top !important;
}
.sexy-facebook:hover {
background-position:-450px bottom !important;
}
.sexy-mixx {
background-position:-250px top !important;
}
.sexy-mixx:hover {
background-position:-250px bottom !important;
}
.sexy-script-style {
background-position:-400px top !important;
}
.sexy-script-style:hover {
background-position:-400px bottom !important;
}
.sexy-designfloat {
background-position:-550px top !important;
}
.sexy-designfloat:hover {
background-position:-550px bottom !important;
}
.sexy-syndicate {
background-position:-150px top !important;
}
.sexy-syndicate:hover {
background-position:-150px bottom !important;
}
.sexy-email {
background-position:-753px top !important;
}
.sexy-email:hover {
background-position:-753px bottom !important;
}


</style>


Now Save the template and again expand the template


Step 3 Please find this code:

then, copy paste this HTML composition after the code


<div class='sexy-bookmarks'><ul class='socials'><li class='sexy-delicious'><a expr:href='&quot;http://del.icio.us/post?url=&quot; + data:post.url + &quot;&amp;title=&quot; + data:post.title' target='_blank'/></li>
<li class='sexy-digg'><a expr:href='&quot; http://digg.com/submit?url=&quot; + data:post.url + &quot;&amp;title=&quot; + data:post.title' target='_blank'/></li>
<li class='sexy-technorati'><a expr:href='&quot; http://technorati.com/faves?add=&quot; + data:post.url + &quot;&amp;title=&quot; + data:post.title' target='_blank'/></li>
<li class='sexy-reddit'><a expr:href='&quot; http://www.reddit.com/submit?url=&quot; + data:post.url + &quot;&amp;title=&quot; + data:post.title' target='_blank'/></li>
<li class='sexy-stumble'><a expr:href='&quot; http://www.stumbleupon.com/submit?url=&quot; + data:post.url + &quot;&amp;title=&quot; + data:post.title' target='_blank'/></li>
<li class='sexy-designfloat'><a expr:href='&quot;http://www.designfloat.com/submit.php?url=&quot; + data:post.url + &quot;&amp;title=&quot; + data:post.title' target='_blank'/></li>
<li class='sexy-facebook'><a expr:href='&quot; http://www.facebook.com/sharer.php?u=&quot; + data:post.url + &quot;&amp;title=&quot; + data:post.title' target='_blank'/></li>
<li class='sexy-twitter'><a expr:href='&quot; http://twitthis.com/twit?url=&quot; + data:post.url + &quot;&amp;title=&quot; + data:post.title' target='_blank'/></li>
<li class='sexy-furl'><a expr:href='&quot; http://www.furl.net/storeIt.jsp?u=&quot; + data:post.url + &quot;&amp;title=&quot; + data:post.title' target='_blank'/></li>
<li class='sexy-syndicate'><a href='http://feeds2.feedburner.com/YOUR-FEEDBURNER-ID' title='Subscribe to RSS'/></li>
<li class='sexy-email'><a expr:href='&quot; mailto:?subject=&quot; + data:post.url + &quot;&amp;title=&quot; + data:post.title' target='_blank'/></li>
</ul><span class='sexy-rightside'/></div>


. Change YOUR FEEDBURNER ID in the code to your Feedburner Url .
Save Your Template. And it is done.


Any problems tell me through the comments Form..............